Psilocybe natalensis is a psilocybin-containing mushroom that grows very similarly to Psilocybe cubensis indoors, and if you've grown cubensis before, you'll find natalensis familiar but with a few key differences worth knowing. If this is your first grow, this guide walks you through every stage from sourcing spores to harvesting. Before anything else, though, you need to understand the legal situation in your country, because cultivation of psilocybin mushrooms is restricted in most places and the risks are real.
How to Grow Psilocybe Natalensis Indoors Step by Step
Marcus Holloway
24 Mar 2026
What Psilocybe natalensis actually is
Psilocybe natalensis is a psilocybin mushroom in the family Hymenogastraceae, closely related to Psilocybe cubensis. It's sometimes called "Natal Super Strength" in cultivation communities, a nod to its reportedly high potency. Like cubensis, it produces the indole alkaloids psilocybin and psilocin as its primary active compounds, along with related analogs including baeocystin, norbaeocystin, and aeruginascin. Its morphology differs slightly from cubensis, including differences in the partial veil (annulus) structure and spore characteristics, but its cultivation requirements are similar enough that most cubensis techniques translate directly.
When growers talk about "growing" P. natalensis, they mean the full indoor cultivation cycle: inoculating a sterilized or pasteurized substrate with spores or mycelium spawn, allowing the fungal network (mycelium) to colonize that substrate, then triggering fruiting conditions so the mushroom produces actual caps and stems. You're not just germinating seeds. You're running a weeks-long biological process that requires attention to cleanliness, humidity, temperature, and gas exchange at every stage.
Legality and safety: read this before you start
Psilocybin and psilocin are controlled substances in most countries, and cultivating mushrooms that produce them is illegal in the majority of jurisdictions. The legal picture varies significantly by country and even by region within countries, so you need to check your own local laws before proceeding.
In the United States, psilocybin is a Schedule I controlled substance federally, and cultivating psilocybin-containing mushrooms is illegal at the federal level. A small number of cities and states have decriminalized possession or shifted enforcement priorities, but "decriminalized" is not the same as legal, and cultivation remains prosecutable. In Canada, psilocybin is controlled under the Controlled Drugs and Substances Act, though spores (which don't yet contain psilocybin) are sold openly in some contexts because spores themselves don't trigger the same legal status as the fruiting body or mycelium. In Australia, the Commonwealth's Office of Drug Control has stated explicitly that it does not have the power to grant permission to cultivate psilocybine-containing mushrooms, meaning cultivation is not permitted under Commonwealth law. In many countries, UN drug treaty obligations mean national law restricts psilocybin cultivation and possession.
On safety: mushroom cultivation involves creating warm, humid, substrate-rich environments that are also excellent conditions for mold growth. Common contaminants like Aspergillus species are dangerous to people with weakened immune systems, asthma, COPD, or other lung conditions. The CDC specifically notes that immunocompromised individuals face elevated health risks from Aspergillus exposure. If you or anyone in your household falls into a higher-risk category, take contamination control seriously. Work in well-ventilated areas and dispose of contaminated substrate in sealed bags, outside. There are no official numeric thresholds for safe indoor mold exposure, which means prevention, not measurement, is the only reliable protection.
Getting your starting material
You have two main options for starting material: spore syringes/prints, or live spawn (grain jars or agar cultures already colonized with mycelium). Spores are the more common starting point for home growers and, depending on jurisdiction, may occupy a different legal status than live mycelium. Live spawn is faster and more reliable but harder to source and carries more legal complexity since the mycelium is actively producing the controlled compounds.
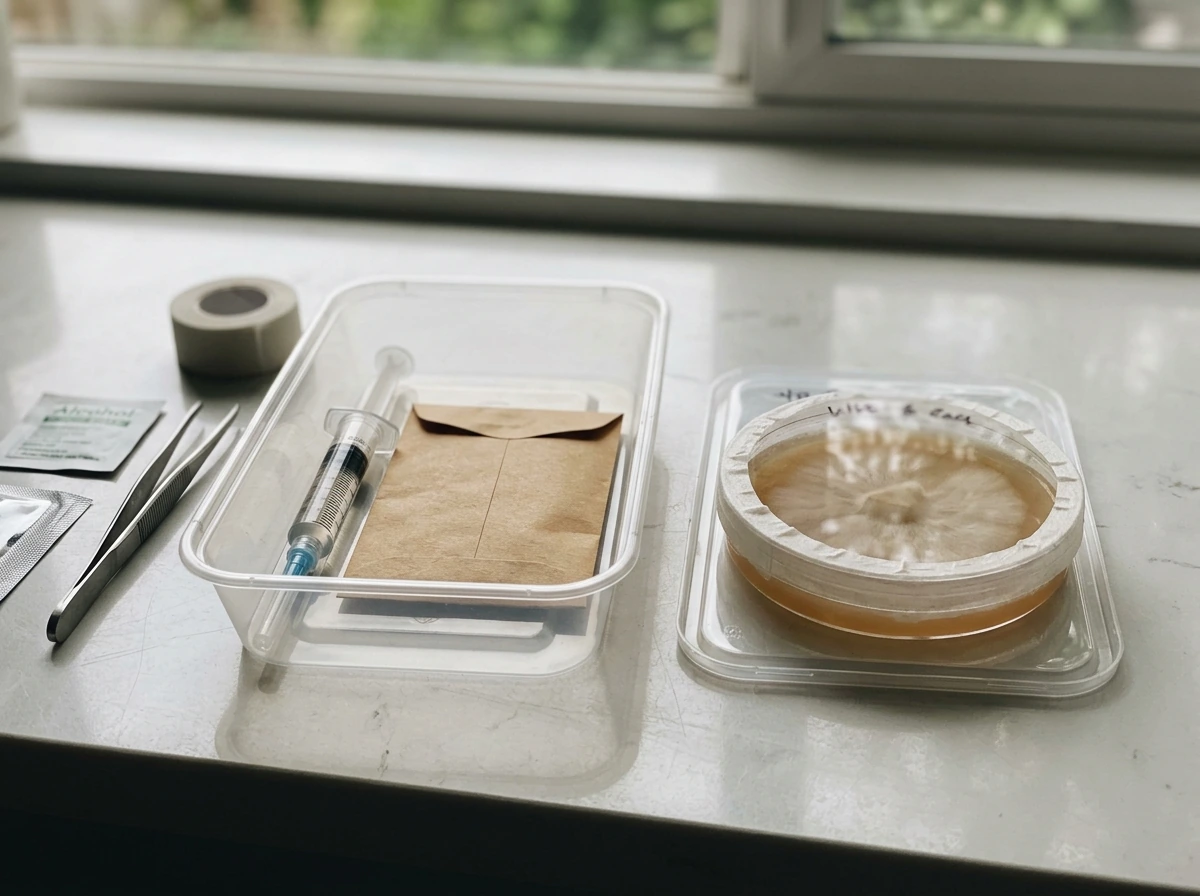
Spore syringes and prints
A spore syringe is a liquid suspension of P. natalensis spores in sterile water, drawn into a syringe for easy inoculation. A spore print is dried spores on paper, which you can rehydrate into your own syringe. Buy from a reputable vendor with positive community reviews. For this species, look specifically for "Psilocybe natalensis" or "Natal SS" listings. Quality varies, so ask in cultivation communities before purchasing. Store syringes in a refrigerator (2 to 8 degrees C) and use within 6 to 12 months for best results.
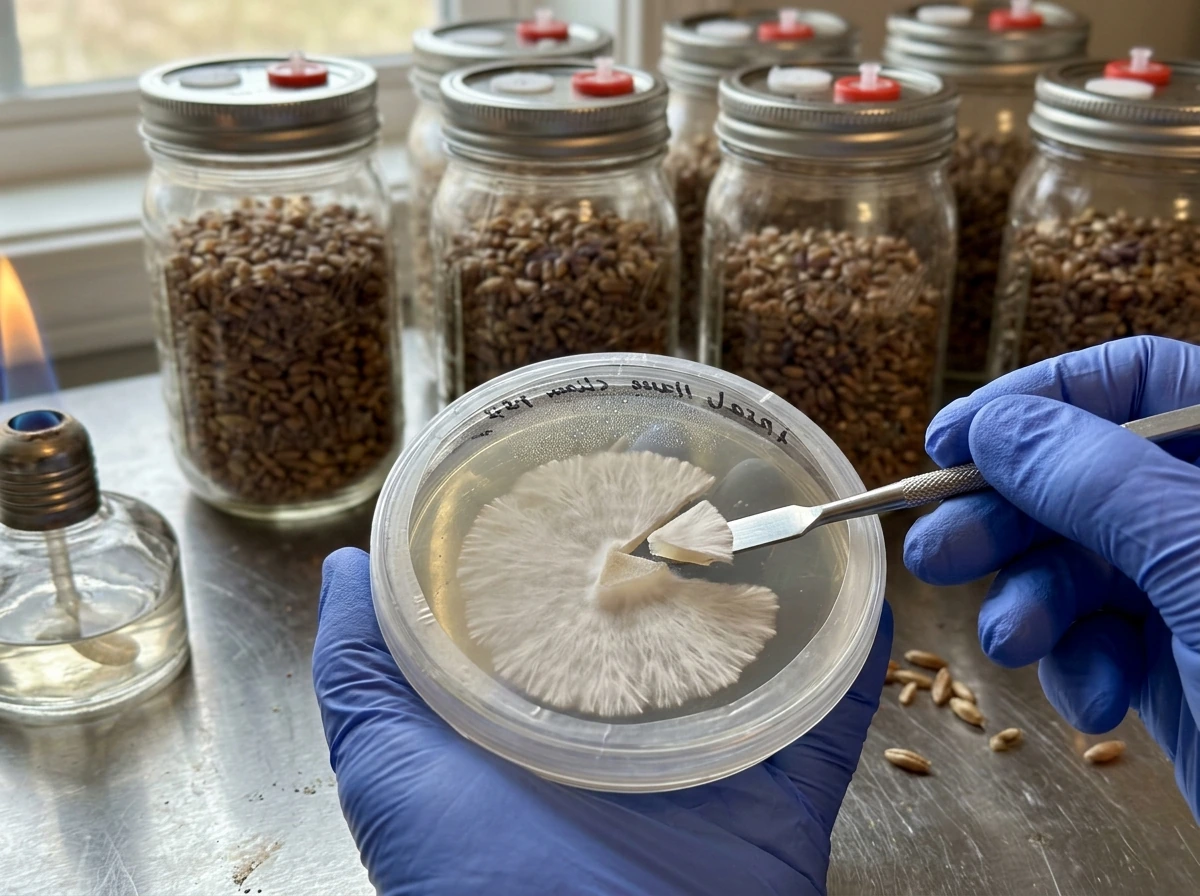
Agar and grain spawn
If you have access to agar lab skills or a trusted source of colonized grain spawn, you can skip the spore germination phase entirely. Grain-to-grain transfers let you expand colonized grain spawn into fresh grain jars, dramatically speeding up your timeline. This is the approach experienced growers use when they already have a trusted culture established, and it's worth learning if you plan multiple grows.
Substrate recipes, hydration, and preparation
Substrate is what the mycelium eats. P. natalensis colonizes a wide range of substrates, broadly the same as P. cubensis. The two most practical approaches for home growers are the Brown Rice Flour and Vermiculite (BRF/PF Tek) method for small first-time grows, and bulk substrate (grain to coir or manure-based mixes) for higher yields.
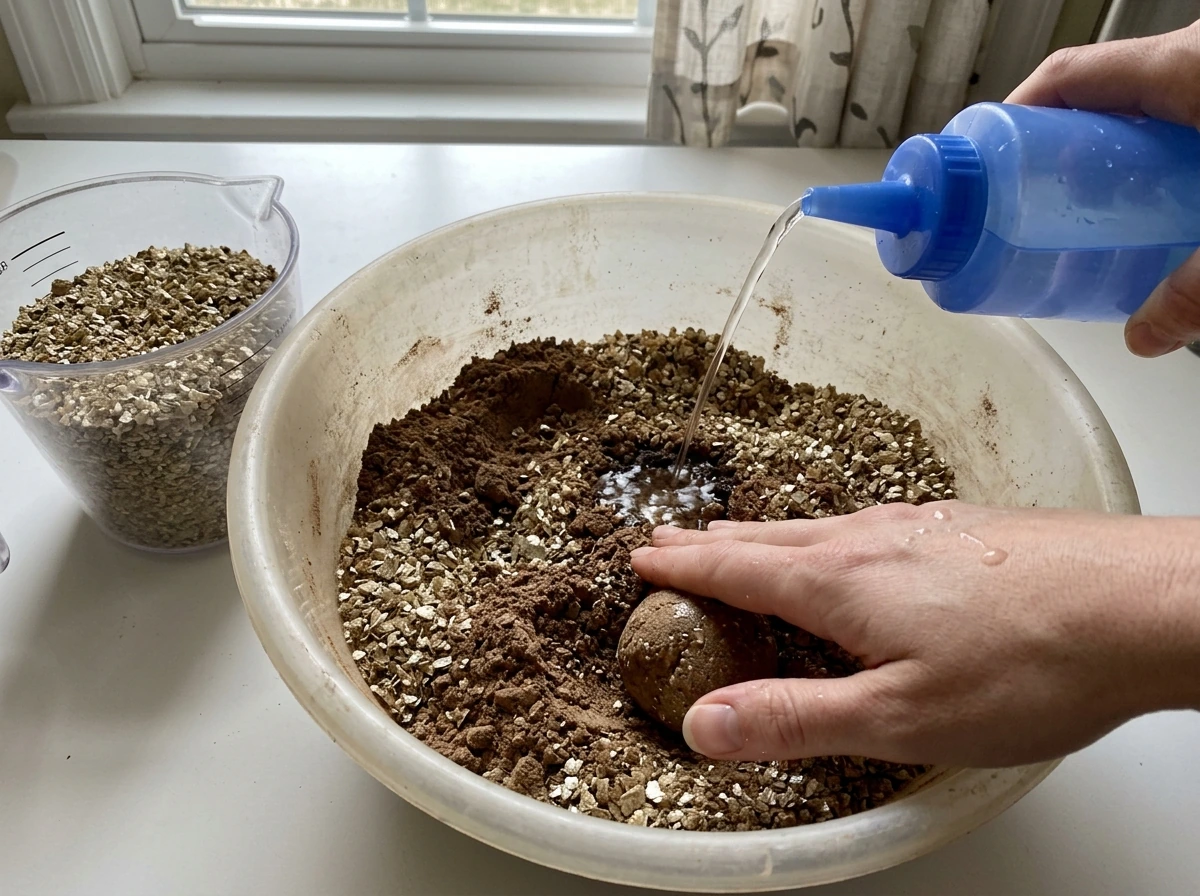
BRF/PF Tek (good for beginners)
Mix 2 parts brown rice flour, 1 part fine vermiculite, and enough water to reach field capacity (squeeze a handful, and only a few drops should come out). Add a layer of dry vermiculite on top of the mix in each jar as a contamination barrier. Load into half-pint mason jars, leaving a 1-inch gap at the top for the dry verm layer. Seal with a polyfill-stuffed lid or foil and pressure cook at 15 PSI for 60 minutes. Let jars cool to room temperature (18 to 24 hours) before inoculating.
Grain jars (faster colonization, higher yields)
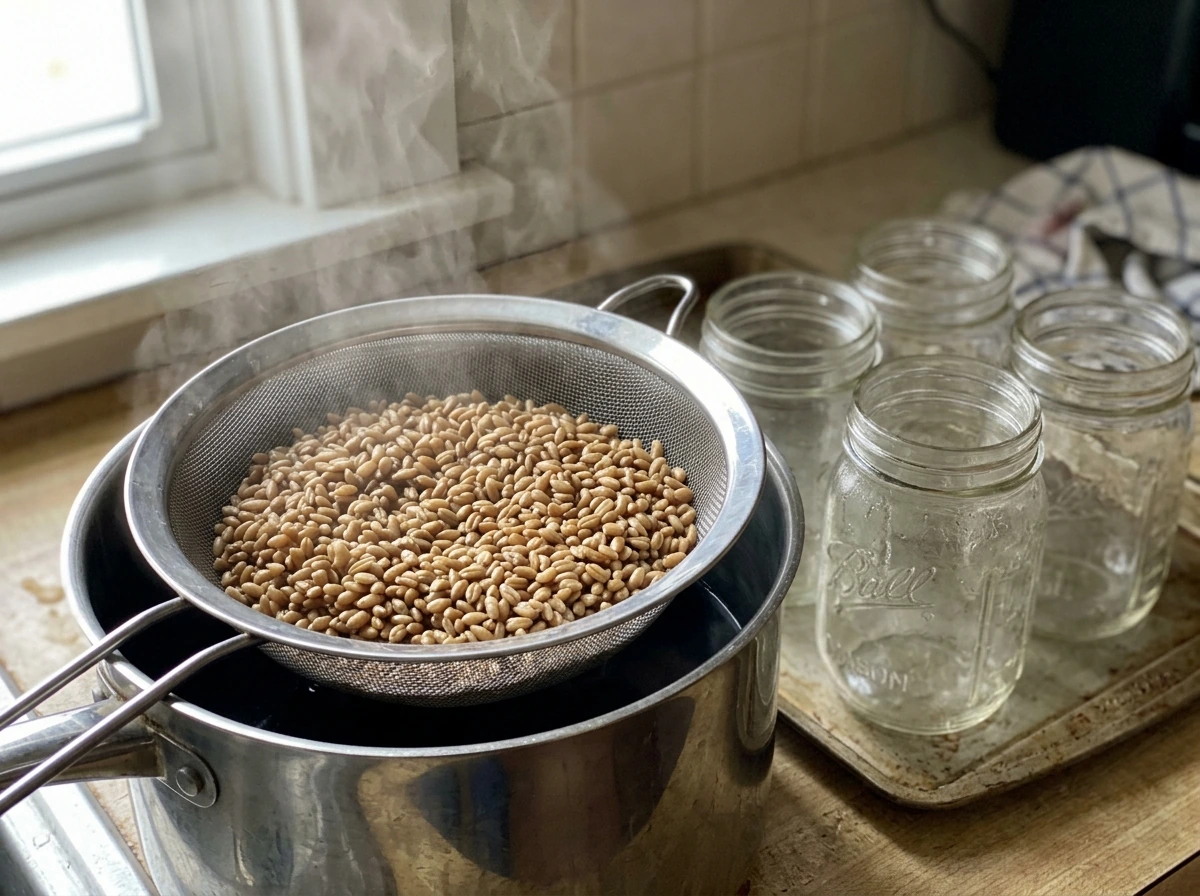
Rye berries, wheat berries, whole oats, and popcorn all work well. Simmer grain in water until just starting to soften (about 15 to 20 minutes for rye), drain, and allow the surface to dry slightly (no visible surface moisture). Load into jars with self-healing injection ports and filter patch lids, or make your own with polyfill. Pressure cook at 15 PSI for 90 minutes. Grain jars colonize faster than BRF and produce more spawn mass for bulk grows.
Bulk substrate for fruiting
Coco coir and vermiculite (50/50 by volume) is the most reliable, contamination-resistant bulk substrate for home growers. Mix with boiling water to field capacity (the "boiling tek" method), cover, and allow to cool. No pressure cooker needed. Coco coir has limited nutrition, which keeps contamination at bay. For more aggressive growth and bigger flushes, you can use manure-based or supplemented substrates, but these require full sterilization at 15 PSI for 2.5 hours and carry higher contamination risk.
| Substrate | Preparation method | Colonization speed | Contamination risk | Best for |
|---|---|---|---|---|
| BRF/Vermiculite (PF Tek) | Pressure cook 15 PSI, 60 min | Slow (3 to 5 weeks) | Low to medium | Beginners, small grows |
| Grain (rye/oats/corn) | Pressure cook 15 PSI, 90 min | Fast (1 to 2 weeks) | Medium | Spawn production, experienced growers |
| Coco coir + vermiculite | Boiling water, pasteurize | Medium (2 to 3 weeks) | Very low | Bulk fruiting, all skill levels |
| Supplemented bulk (manure/straw) | Pressure cook 15 PSI, 2.5 hrs | Fast (1 to 2 weeks) | High | Experienced growers, maximum yield |
Inoculation and colonization
Inoculation is the step where you introduce spores or spawn to your substrate. This is where contamination risk is highest, so your technique matters more here than anywhere else in the process.
Setting up a clean workspace
You don't need a laminar flow hood for home grows, but you do need to minimize airborne contamination. Still air box (SAB) technique works well: use a large clear storage tote with arm holes cut in the side, wiped down with 70% isopropyl alcohol. Let the air settle for a few minutes before working. Alternatively, inoculate in a small, still room with no ventilation running and surfaces wiped with isopropyl. Wear gloves and a face mask. Wipe everything, including the syringe needle, with isopropyl before use. Flame-sterilize the needle until glowing red, allow it to cool for a few seconds, then inoculate.
Inoculation steps
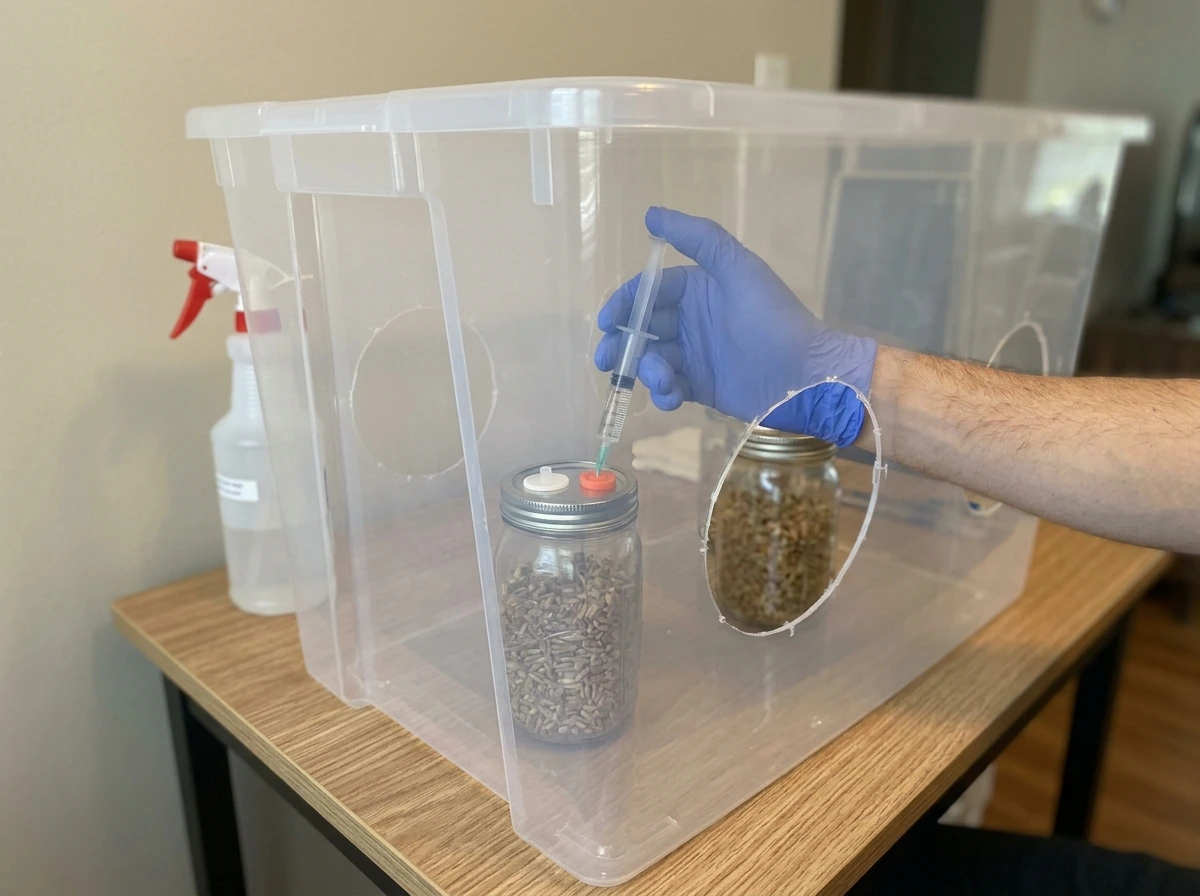
- Wipe the injection port or jar lid with 70% isopropyl alcohol.
- Flame-sterilize the syringe needle and allow it to cool briefly.
- Inject 1 to 2 ml of spore solution per half-pint jar, distributing around the sides of the jar (for BRF) so spores contact the substrate without pooling.
- For grain jars, inject through the self-healing port and shake to distribute.
- Seal the injection port with micropore tape if needed.
- Label each jar with the date and species.
- Move jars to a dark, warm location for colonization.
Colonization conditions and timing
P. natalensis colonizes best between 24 and 28 degrees C (75 to 82 F). Keep jars in a dark location. A heat mat set to the lower end of this range works well if your home is cooler. Avoid temperatures above 30 degrees C, which can stress the mycelium or encourage contamination. Do not open jars during colonization. You should see white fluffy mycelium spreading through the substrate within 5 to 10 days of inoculation. Full colonization of BRF jars typically takes 3 to 5 weeks from spore inoculation. Grain jars colonize faster, often in 1 to 2 weeks. Let the mycelium consolidate for 3 to 7 days after it appears fully colonized before moving to fruiting.
You may see "metabolites" (yellowish or blue-tinged bruising) in the substrate. Blue bruising when mycelium is disturbed is normal for psilocybin-containing species and is caused by oxidation of psilocin. It's not contamination. True contamination looks green, black, orange, or pink, often with a fuzzy or powdery texture, and usually smells off.
Fruiting: environment, humidity, harvesting
Once colonization is complete, you shift the environment to trigger fruiting. For bulk grows, you'll mix colonized grain into your bulk substrate (casing or direct bulk), then move to a fruiting chamber. For PF Tek, you can birth the colonized cakes and place them in a fruiting chamber directly.
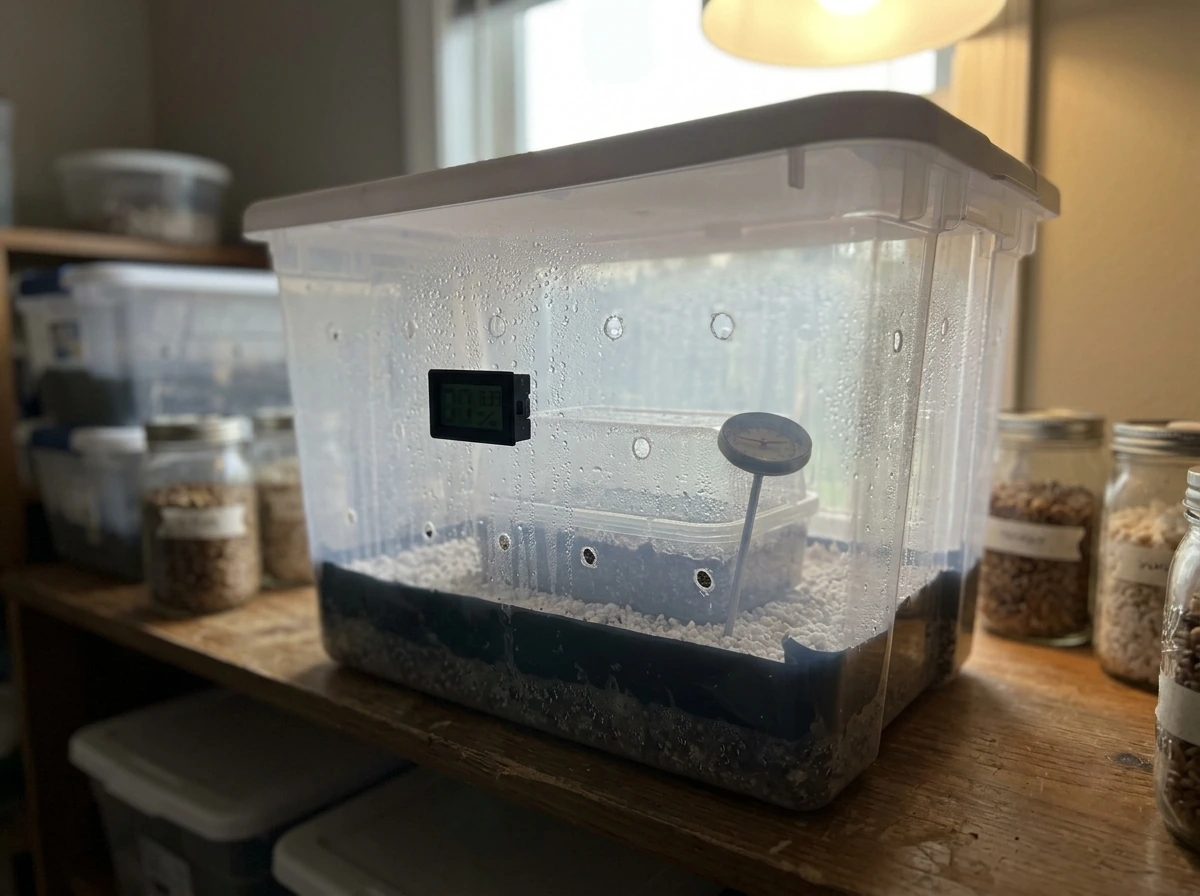
Fruiting chamber setup
The most common home setup is a "shotgun fruiting chamber" (SGFC), a clear storage tote with holes drilled every 2 inches on all sides and the bottom, packed with perlite soaked in water for passive humidity. A more controllable option is a Martha tent setup (wire shelving inside a greenhouse tent with an ultrasonic humidifier and an inkbird humidity controller). Either way, you're targeting:
- Humidity: 90 to 95% relative humidity during pinning and early fruiting
- Temperature: 22 to 26 degrees C (72 to 78 F) for fruiting, slightly cooler than colonization
- Fresh air exchange (FAE): Fan or manual fanning 2 to 4 times per day to prevent CO2 buildup
- Light: 12 hours of indirect light per day (a nearby window or a cheap LED on a timer) to help direct pin formation
Mist the walls of the chamber (not directly on the substrate) 2 to 4 times per day to maintain humidity. Fan briefly after misting to exchange air. P. natalensis typically pins within 5 to 14 days of being placed in fruiting conditions, though the first flush sometimes takes longer if conditions aren't quite dialed in.
Harvesting and subsequent flushes
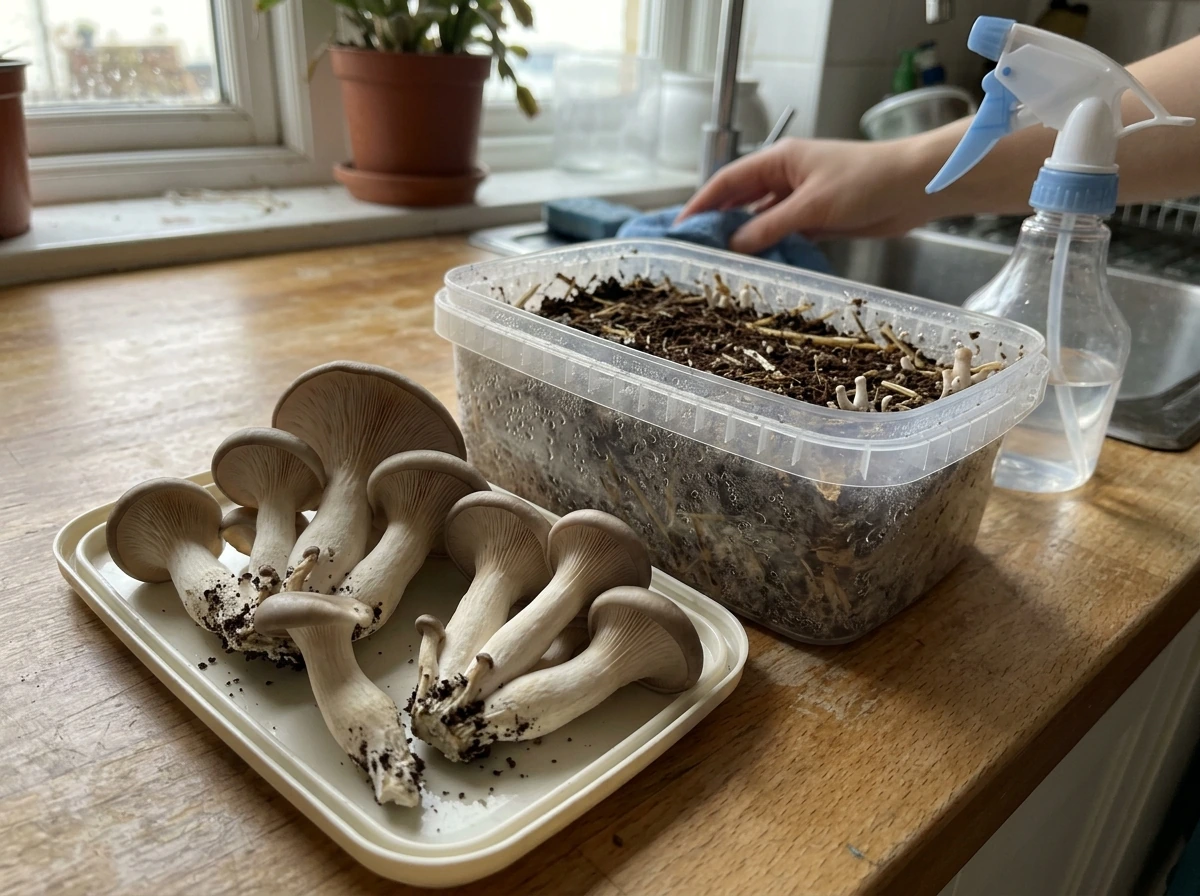
Harvest mushrooms just before or as the veil under the cap begins to tear. Once the veil tears, the mushroom is releasing spores, which will leave a dark deposit on the substrate and surrounding mushrooms. To harvest, twist and pull gently at the base rather than cutting, which leaves less substrate debris that could rot. After the first flush, remove any remaining pins or mushroom bases, lightly mist and fan, and allow the substrate to rest for 5 to 10 days before the next flush. P. natalensis typically produces 2 to 4 flushes before the substrate is exhausted, with the first and second flushes usually being the largest.
Troubleshooting common problems
Contamination
Green mold (Trichoderma) is the most common contamination. It appears as patches of green, usually starting at the injection site or on exposed substrate. If you see green on a jar during colonization, isolate it immediately in a sealed bag and dispose of it outside. Do not open it indoors. Orange or black contamination is also a discard. If contamination appears on bulk substrate after colonization, you may be able to scrape out the affected area and continue if the contamination is isolated and the mycelium is otherwise strong, but often the cleanest decision is disposal. Review your sterilization technique and workspace cleanliness before your next run.
Stalled colonization
If mycelium growth slows or stops well before full colonization, check temperature first. Too cold (below 21 degrees C) dramatically slows growth. Too hot (above 30 degrees C) can arrest mycelium or kill it. Weak or old spore solution is another common culprit, especially if you're seeing nothing 2 weeks after inoculation. Shake the jar gently to redistribute spores. If nothing develops after 3 weeks with a good syringe and proper temperature, the inoculation likely failed, and you'll need to start fresh.
No pins forming
If fully colonized substrate refuses to pin after 2 weeks in fruiting conditions, the most common causes are insufficient fresh air exchange (CO2 too high), humidity too low, or temperature too warm. Try fanning more aggressively, increasing your misting frequency, and dropping temperature by 2 to 3 degrees. A "cold shock" (moving the substrate to a cooler area for 12 to 24 hours, around 18 degrees C) can sometimes trigger pinning. Also make sure light is present, since P. natalensis, like most cultivated species, uses light cues to direct pin formation.
Low yields
Thin flushes are usually a product of substrate quality, humidity management, or over-contamination of the bulk. Check that your substrate reached field capacity before inoculation (too dry means less food for the mycelium). Make sure you aren't misting directly on the substrate surface, which can cause pooling and anaerobic rot. If your first flush was decent but subsequent flushes are tiny, the substrate is likely exhausted. Consider a "rehydration soak" between flushes: submerge the spent substrate block in cold water for 12 to 24 hours, drain, and return to fruiting conditions.
Weird growth patterns or aborts
Aborted pins (pins that start forming but die before maturing) are usually a sign of inconsistent humidity or CO2 spikes. Increase fanning and check that your humidity controller is set correctly. Malformed or "mutant" looking mushrooms are usually environmental stress but aren't a safety or potency concern. Harvested mushrooms that show rapid blueing when handled are normal for P. natalensis and reflect psilocin content, not a problem.
Realistic timeline and expectations
| Stage | Typical duration | Key variables |
|---|---|---|
| Substrate prep and sterilization | 1 to 2 days | Method (pressure cook vs. pasteurize) |
| Inoculation to first visible mycelium | 5 to 10 days | Temperature, spore viability |
| Full colonization (BRF) | 3 to 5 weeks | Temperature, spore quality |
| Full colonization (grain) | 1 to 2 weeks | Temperature, grain prep |
| Colonization to first pins | 5 to 14 days | Humidity, FAE, light |
| First flush harvest | 3 to 7 days after pinning | Mushroom size preference |
| Between flushes (rest period) | 5 to 10 days | Substrate hydration |
| Total grow (spore to third flush) | 8 to 14 weeks | Technique, conditions |
P. natalensis is not the easiest first grow, but it's also not dramatically harder than cubensis if you have clean technique and a reliable fruiting chamber. Most failures come down to contamination from poor sterilization or sloppy inoculation, not from anything species-specific. Get those fundamentals right and the rest follows. If you're just starting out with psilocybe cultivation generally, it's worth reading through general how to grow mushrooms psilocybe cultivation guides first to get comfortable with the shared workflow before species-specific nuances start to matter. psilocybe cyanescens how to grow
FAQ
Is it legal to start with spores but not grow to fruiting?
If you are growing for research, the cleanest legal workaround is often to keep your work at the spore stage only (spores do not contain the psychoactive compounds), but you still need to verify local rules for possession and handling. Once you move into fruiting, the regulatory risk increases sharply in most jurisdictions.
What should I do if I see no mycelium after a couple weeks?
Yes, but only if you treat it as a different starting point with its own risk. Old or poorly stored spores can underperform, and “no growth after 2 weeks” often turns out to be weak viability rather than a technique error. A practical decision aid is to compare timelines, if your last successful syringe colonized within your expected window, a large delay with a new syringe usually points to the inoculum.
Do I need to wait after the jar looks fully colonized before starting fruiting?
With BRF, consolidation time matters. Even if the jar looks fully colonized, waiting about a few extra days before moving to fruiting helps the mycelium stabilize and reduces aborts in the first pin set. Don’t rush immediately after you first see complete whiteness.
How can I tell if my clean technique setup is not working?
Yes. If your still-air box is too drafty or you are opening everything repeatedly, contamination rates jump. A common fix is to do one jar at a time, minimize “needle-in-needle-out” movement, keep containers close to your work area, and let the air settle before each inoculation step.
What are the most common hidden causes of slow or stopped colonization besides temperature?
If your temps are in-range but growth is slow, look at gas exchange and hydration rather than substrate size alone. During colonization you should not open jars, but the lid type still matters for airflow balance over weeks. Also re-check field capacity, if the mix is too wet, oxygen drops and contamination risk rises, if too dry, growth stalls.
Are yellow or blue colors always safe signs, and when should I discard?
Metabolites are not contamination, but they can confuse diagnosis. If you see blue bruising after handling or substrate disturbance, that is expected. True contamination patterns are usually colored fuzzy or powdery growth (green, black, orange, pink) and often an off smell. Isolate immediately if you are unsure, because a “wait and see” approach can ruin multiple jars.
What grain mistakes most often lead to bacterial issues or stalled grain colonization?
Rye grain is usually the fastest for spawn expansion, but it can also fail if you drain too aggressively or leave surface moisture that allows bacterial bloom. A useful check is that the grain should look evenly hydrated with no standing water when loaded, and the jar should still have proper gas exchange for the long colonization window.
Does light really affect pinning for natalensis, and how should I manage it?
Yes, a simple light cue can matter. If you get stalled pinning on fully colonized blocks or cakes, ensure there is some indirect light in the fruiting area. The pins often respond to consistent light timing, even if you are not using strong illumination.
Why does harvest timing change cleanup and contamination risk?
Do not harvest late if you want fewer spore deposits and less mess, timing matters. Harvest as the veil begins to tear, once it fully opens the mushrooms typically drop spores and you will see dark deposits on the substrate and around nearby fruits. Earlier harvesting can also improve cleanup and reduce the chance of secondary contamination after spores spread.
When is scraping contamination on bulk worth trying, and when should I discard?
You can, but only for localized issues. For bulk, scraping out a small, isolated contaminated patch can work when the mycelium is otherwise strong and the contamination is confined. If contamination is widespread, or you see multiple colors, the safest decision is to discard and reset your sterilization and inoculation workflow.
How do I prevent aborted pins once I start seeing pin formation?
For aborted pins, the most common fix is to stabilize humidity and avoid CO2 spikes rather than making large equipment changes. Increase fresh air exchange by fanning briefly after misting, then keep misting directed at chamber walls, not the substrate. Consistency over a single “big adjustment” usually performs better.
What should I do if flushes get progressively thinner?
A rehydration soak can help between flushes, especially after the second flush, if the substrate block has shrunk or feels dry and the next flush is thin. Keep the soak limited to the recommended cold window (12 to 24 hours), then drain thoroughly and return to the same fruiting parameters so you do not swing humidity too hard.